申请SSL证书
安装acme.sh申请证书
1
2
3
4
5
|
curl https://get.acme.sh | sh -s email=[email protected]
# 创建别名
alias acme.sh=~/.acme.sh/acme.sh
#acme启用自动更新
acme.sh --upgrade --auto-upgrade
|
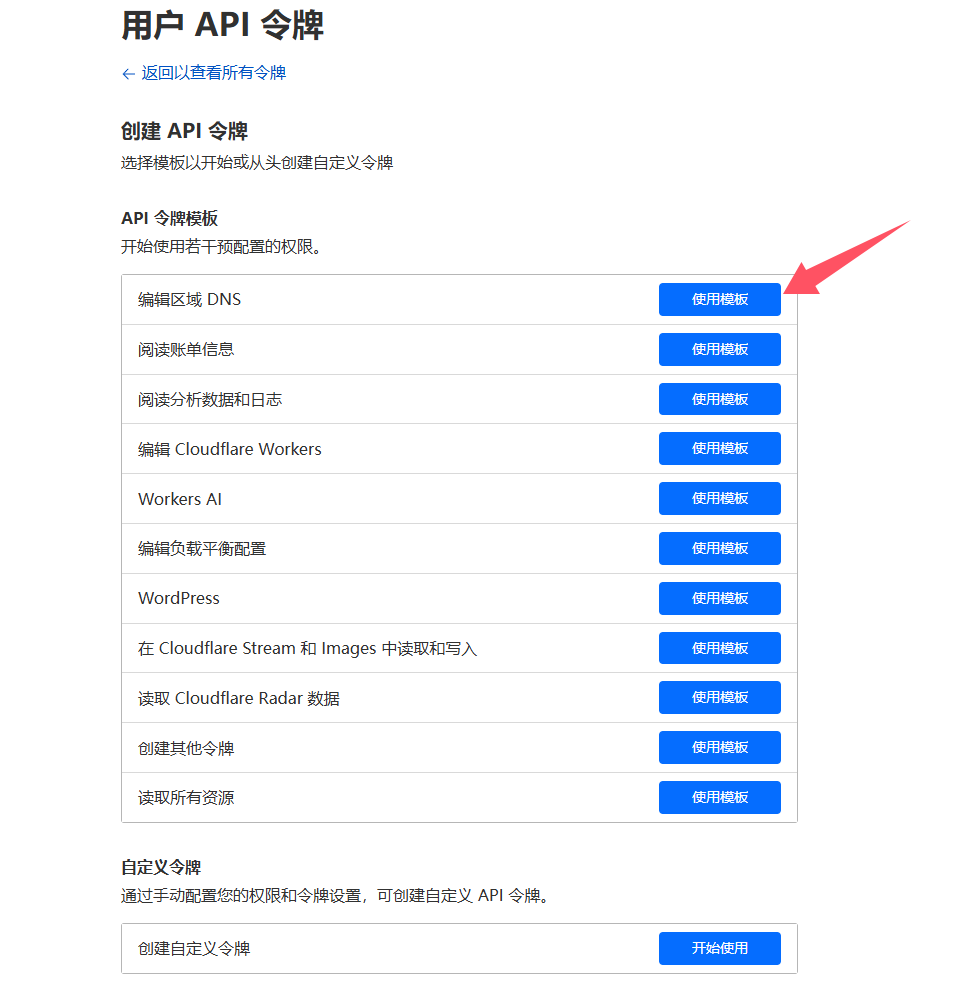
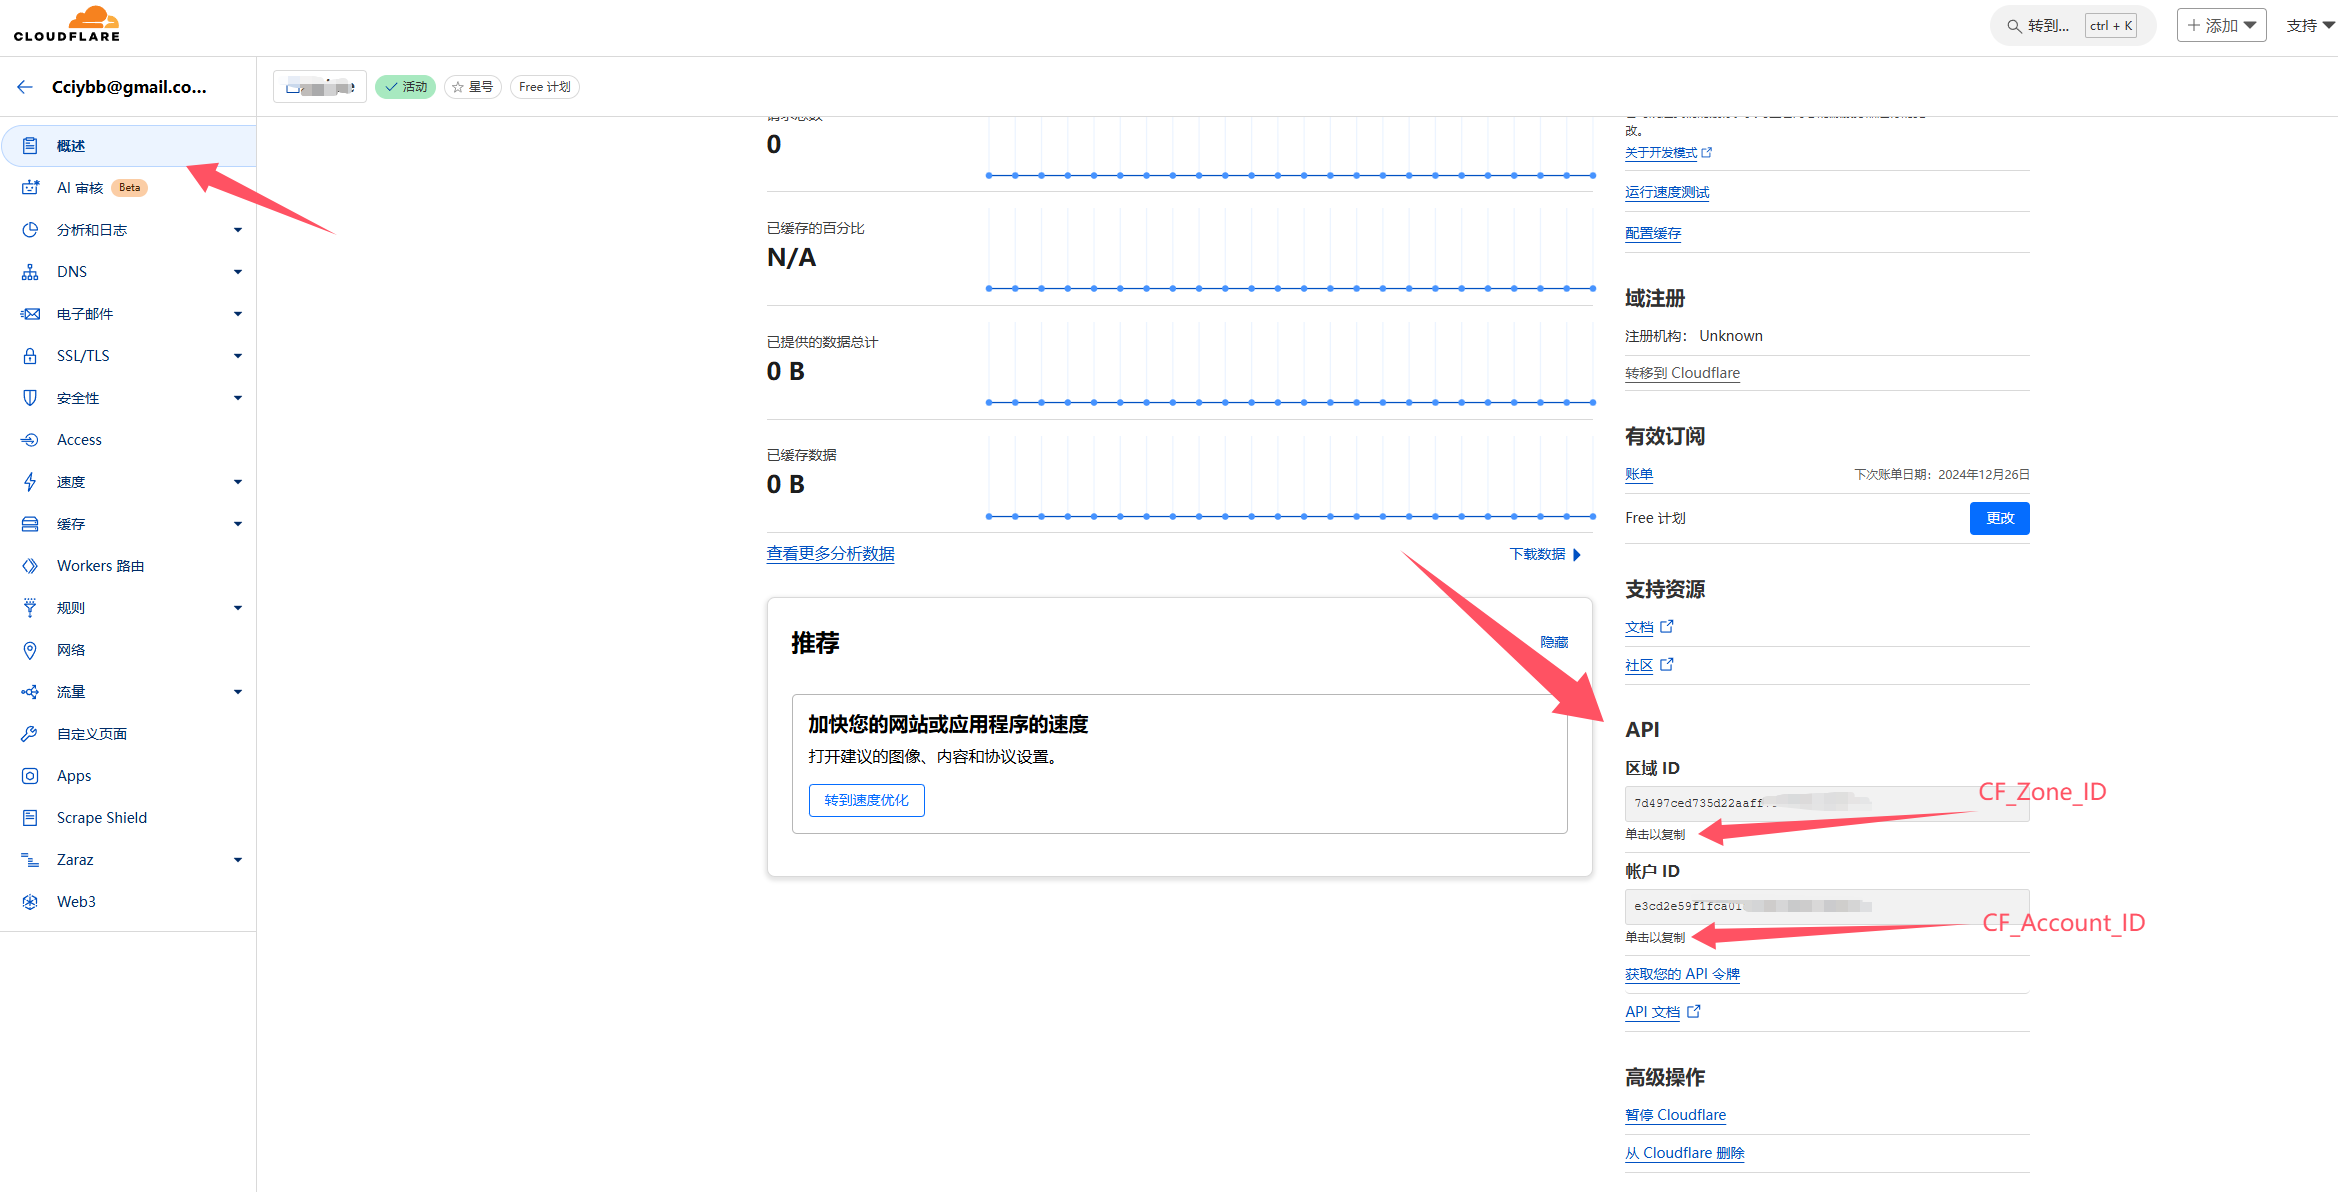
获取cloudflare 配置参数
因为我这边是将域名托管到cf(cloudflare)上面
所以需要获取以下三个参数:CF_Token、CF_Account_ID、CF_Zone_ID
如果是托管在其他域名商可见官方 wiki
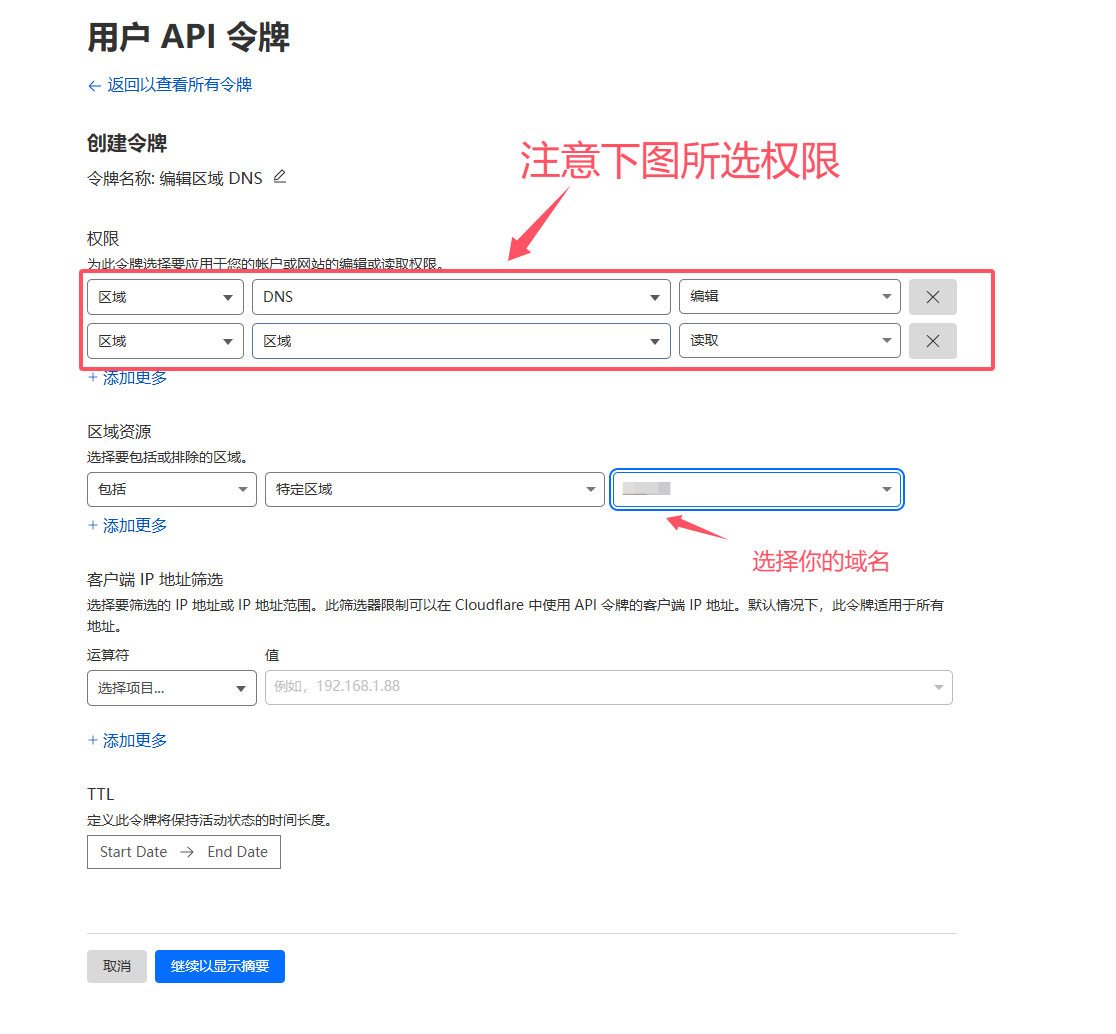
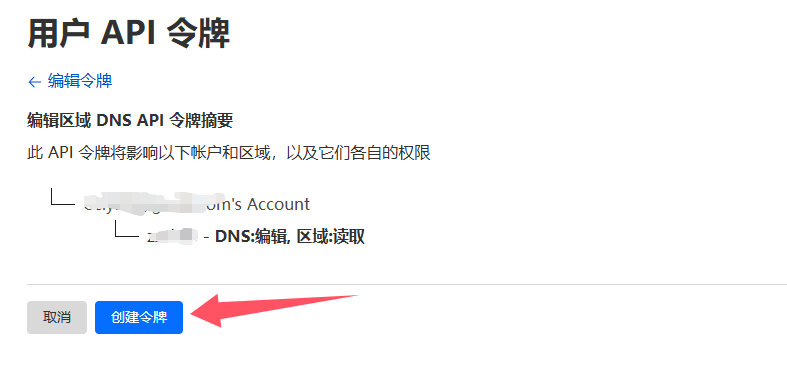
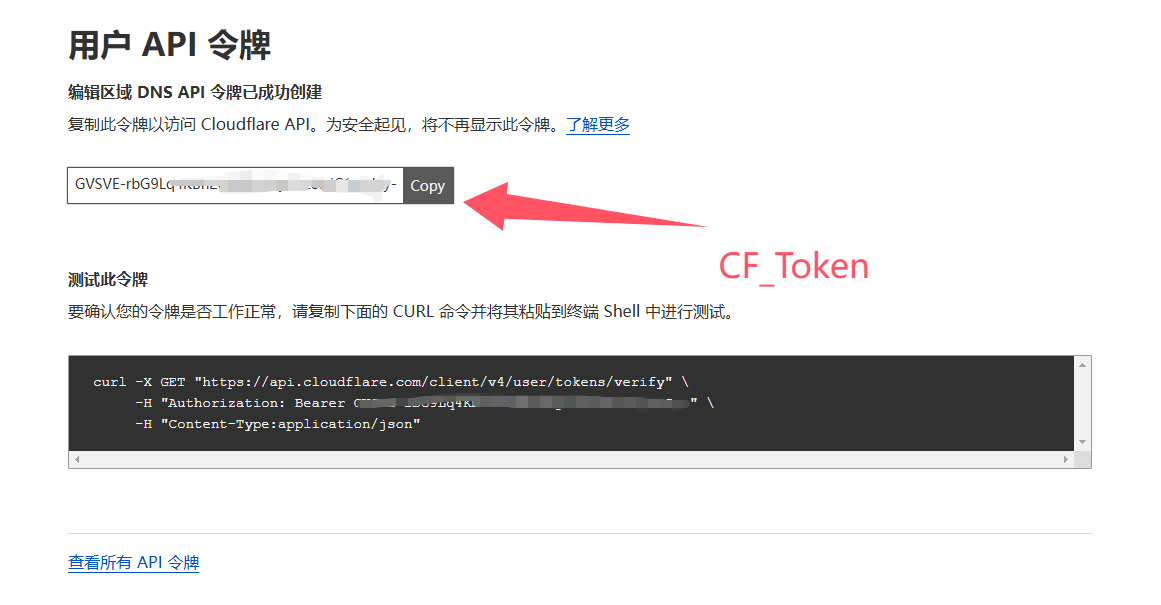
通过 Cloudflare API Token 获取CF_Token。

1
2
3
|
export CF_Token="xxxxxxxxxxxxxxxxxxxxxxxx"
export CF_Account_ID="xxxxxxxxxxxxxxxxxxxxxxxx"
export CF_Zone_ID="xxxxxxxxxxxxxxxxxxxxxxxx"
|
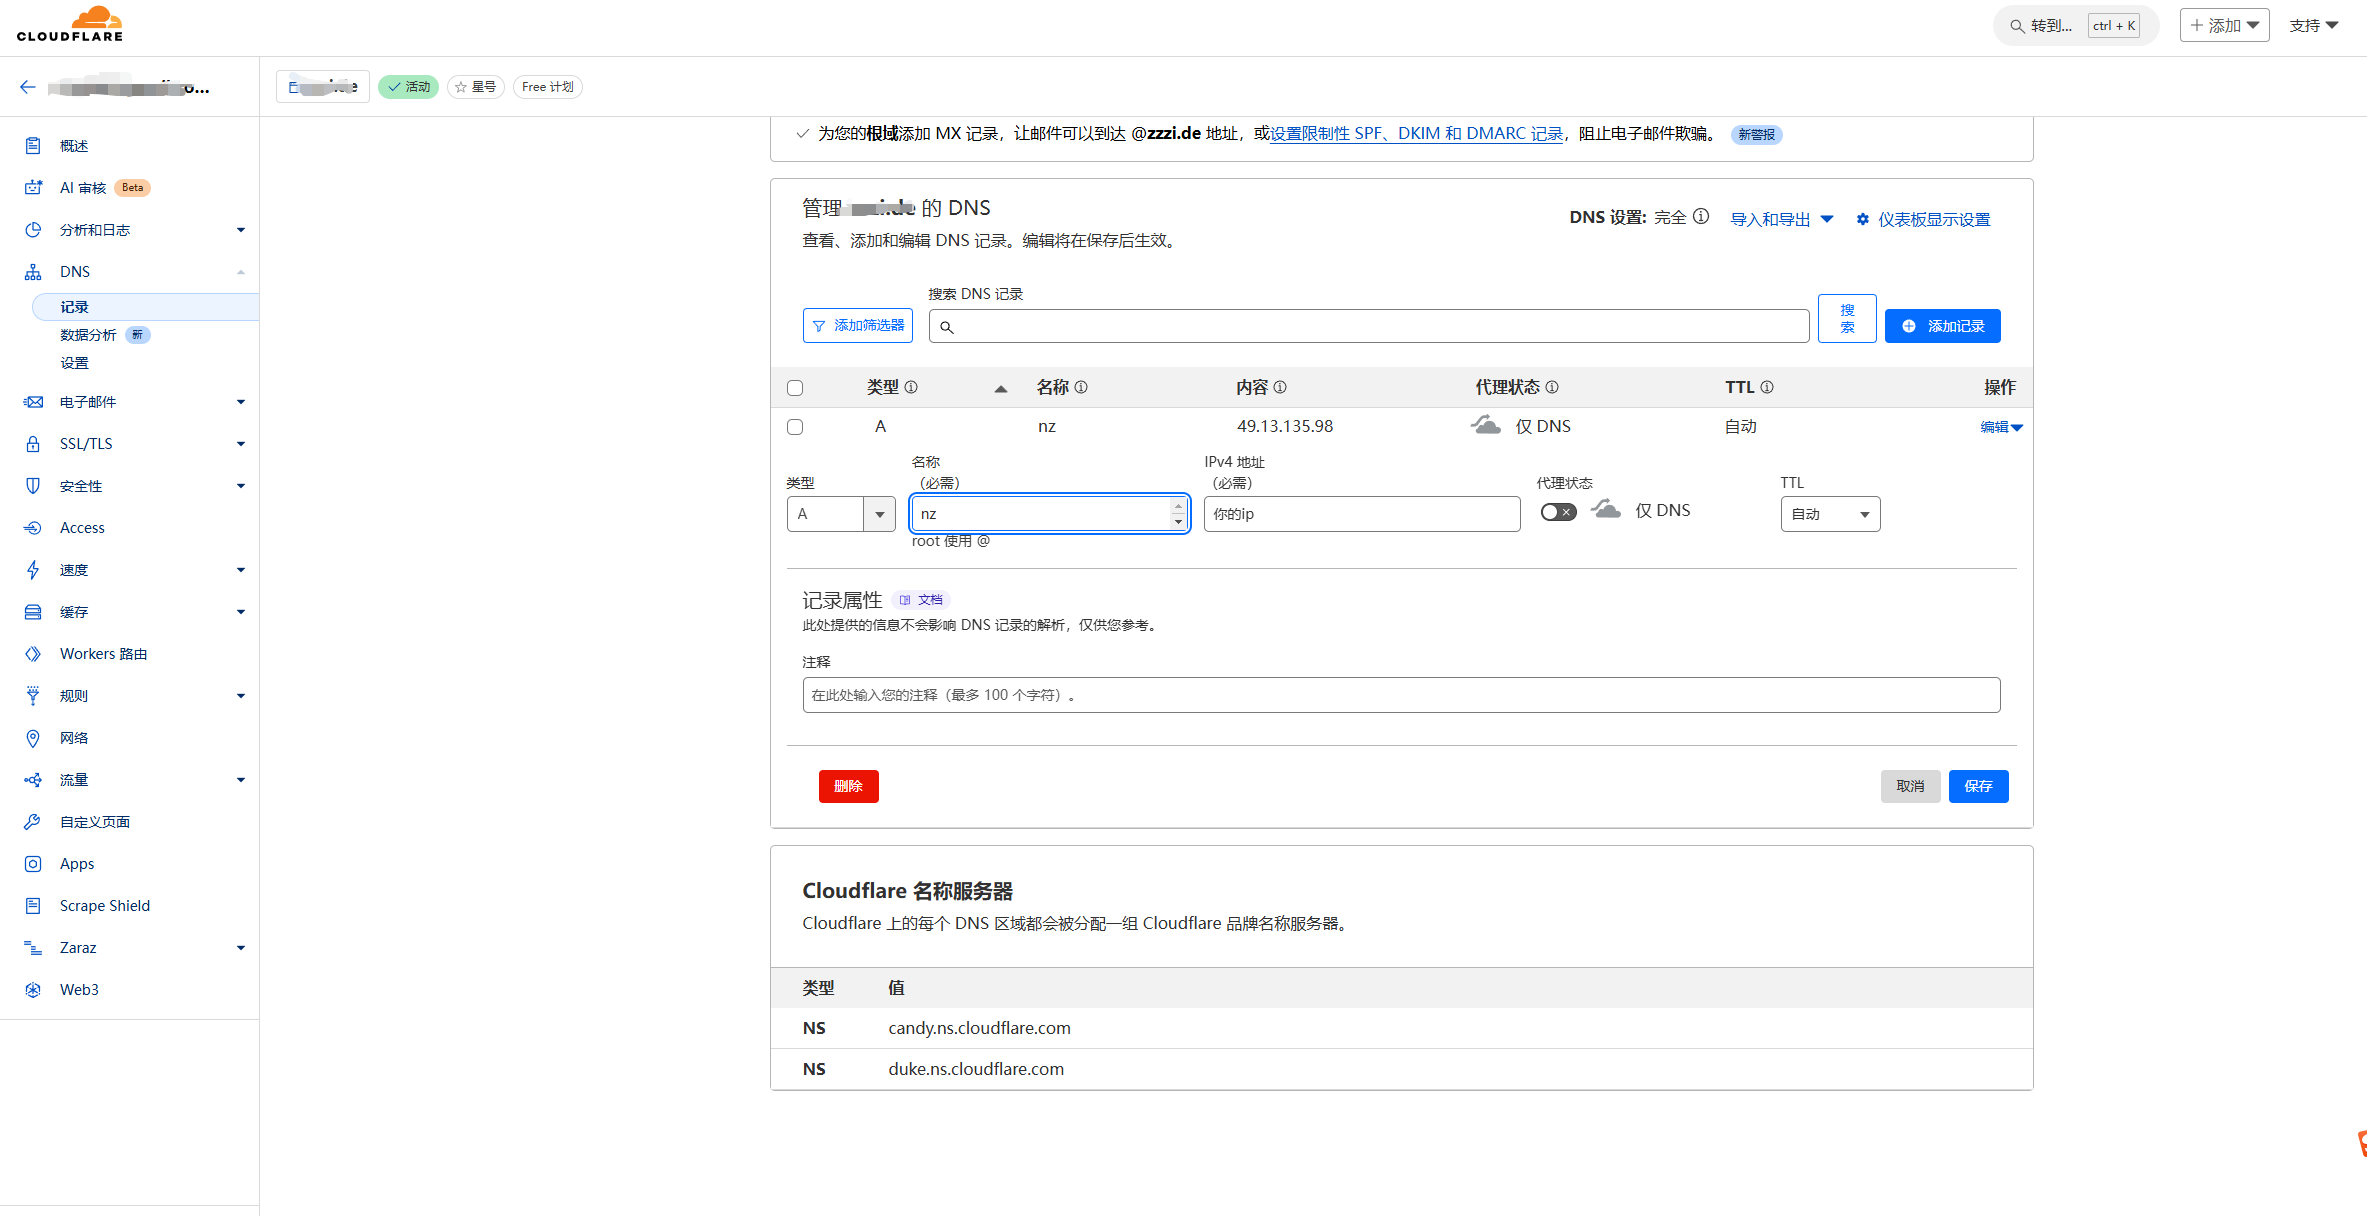
查看是否生效
添加dns
安装nginx
安装先决条件
1
|
sudo apt install curl gnupg2 ca-certificates lsb-release debian-archive-keyring
|
导入官方 Nginx 签名密钥
1
|
gpg --dry-run --quiet --no-keyring --import --import-options import-show /usr/share/keyrings/nginx-archive-keyring.gpg
|
设置 Nginx 存储库
1
2
3
|
echo "deb [signed-by=/usr/share/keyrings/nginx-archive-keyring.gpg] \
http://nginx.org/packages/debian $(lsb_release -cs) nginx" \
    | sudo tee /etc/apt/sources.list.d/nginx.list
|
设置存储库固定优先级
1
2
|
echo -e "Package: *\nPin: origin nginx.org\nPin: release o=nginx\nPin-Priority: 900\n" \
    | sudo tee /etc/apt/preferences.d/99nginx
|
安装最新版 Nginx
1
2
|
sudo apt update
sudo apt install nginx
|
启动nginx
1
|
sudo systemctl start nginx
|
创建nginx 证书目录
1
|
mkdir -p /etc/nginx/ssl
|
申请 Let’s Encrypt免费证书
1
2
|
# 申请通配符证书將下面example.com 替换为你自己的域名
acme.sh --issue --dns dns_cf  -d '*.example.com'
|
申请证书
1
2
3
4
|
acme.sh --installcert -d '*.example.com' \
--key-file /etc/nginx/ssl/example.com.key.pem \
--fullchain-file /etc/nginx/ssl/example.com.fullchain.pem \
--reloadcmd "systemctl reload nginx"
|
安装docker
首先,安装一些必要的软件包:
1
2
3
|
apt update
apt upgrade -y
apt install curl vim wget gnupg dpkg apt-transport-https lsb-release ca-certificates
|
然后加入 Docker 的 GPG 公钥和 apt 源:
1
2
|
curl -sSL https://download.docker.com/linux/debian/gpg | gpg --dearmor > /usr/share/keyrings/docker-ce.gpg
echo "deb [arch=$(dpkg --print-architecture) signed-by=/usr/share/keyrings/docker-ce.gpg] https://download.docker.com/linux/debian $(lsb_release -sc) stable" > /etc/apt/sources.list.d/docker.list
|
然后更新系统后即可安装 Docker CE 和 Docker Compose 插件:
1
2
|
apt update
apt install docker-ce docker-ce-cli containerd.io docker-compose-plugin
|
安装哪吒面板
在面板服务器中,运行以下安装脚本:
1
|
curl -L https://raw.githubusercontent.com/nezhahq/scripts/refs/heads/main/install.sh -o nezha.sh && chmod +x nezha.sh && sudo ./nezha.sh
|
如果你的服务器位于中国大陆,可以使用镜像:
1
|
curl -L https://gitee.com/naibahq/scripts/raw/main/install.sh -o nezha.sh && chmod +x nezha.sh && sudo CN=true ./nezha.sh
|
步骤如下
 1
 2
 3
 4
 5
 6
 7
 8
 9
10
11
12
13
14
15
16
17
18
19
20
21
22
23
24
25
26
27
28
29
30
31
32
33
34
35
36
37
38
39
40
41
42
43
44
45
46
47
48
49
50
|
root@debian-2gb-fsn1-1:~# curl -L https://raw.githubusercontent.com/nezhahq/scripts/refs/heads/main/install.sh -o nezha.sh && chmod +x nezha.sh && sudo ./nezha.sh
  % Total    % Received % Xferd  Average Speed   Time    Time     Time  Current
                                 Dload  Upload   Total   Spent    Left  Speed
100 19236  100 19236    0     0  81455      0 --:--:-- --:--:-- --:--:-- 81855
请自行选择您的安装方式:
1. Docker
2. 独立安装
请输入选择 [1-2]:1
哪吒监控管理脚本
--- https://github.com/nezhahq/nezha ---
1.  安装面板端
2.  修改面板配置
3.  重启并更新面板
4.  查看面板日志
5.  卸载管理面板
————————————————-
6.  更新脚本
————————————————-
0.  退出脚本

请输入选择 [0-6]: 1
> 安装
> 修改配置
正在下载 Docker 脚本
请输入站点标题: test
请输入暴露端口: (默认 8008)8008
请指定安装命令中预设的 nezha-agent 连接地址 (例如 example.com:443)nz.example.com:443
是否希望通过 TLS 连接 Agent?(影响安装命令)[y/N]y
请指定后台语言
1. 中文(简体)
2. 中文(台灣)
3. English
请输入选项 [1-3]1
Dashboard 配置 修改成功,请稍等 Dashboard 重启生效
> 重启并更新
[+] Pulling 7/7
 ✔ dashboard Pulled                                                                                                                                     4.1s
   ✔ 995f0d0f50ce Pull complete                                                                                                                         0.5s
   ✔ 986ff37a7161 Pull complete                                                                                                                         0.5s
   ✔ e2db7ed4cabc Pull complete                                                                                                                         0.6s
   ✔ 5c0f4a488d82 Pull complete                                                                                                                         0.6s
   ✔ f4b0bc460487 Pull complete                                                                                                                         0.6s
   ✔ 2ac6ff50b778 Pull complete                                                                                                                         3.2s
[+] Running 2/2
 ✔ Network dashboard_default  Created                                                                                                                   0.1s
 ✔ Container nezha-dashboard  Started                                                                                                                   0.5s
哪吒监控 重启成功
默认地址:域名:站点访问端口

* 按回车返回主菜单 *
|
配置nginx conf
配置conf
1
|
nano /etc/nginx/conf.d/example.com.conf
|
复制下面配置
 1
 2
 3
 4
 5
 6
 7
 8
 9
10
11
12
13
14
15
16
17
18
19
20
21
22
23
24
25
26
27
28
29
30
31
32
33
34
35
36
37
38
39
40
41
42
43
44
45
46
47
48
49
50
51
52
53
54
55
56
57
58
|
server {
    listen 443 ssl;
    listen [::]:443 ssl;
    http2 on; # Nginx > 1.25.1,请注释上面两行,启用此行

    server_name nz.example.com; # 替换为你的域名
    ssl_certificate          /etc/nginx/ssl/example.com.fullchain.pem; # 域名证书路径
    ssl_certificate_key      /etc/nginx/ssl/example.com.key.pem;       # 域名私钥路径
    ssl_stapling on;
    ssl_session_timeout 1d;
    ssl_session_cache shared:SSL:10m; # 如果与其他配置冲突,请注释此项
    ssl_protocols TLSv1.2 TLSv1.3;

    underscores_in_headers on;

    # grpc 相关
    location ^~ /proto.NezhaService/ {
        grpc_set_header Host $host;
        # grpc_set_header nz-realip $http_CF_Connecting_IP; # 替换为你的 CDN 提供的私有 header,此处为 CloudFlare 默认
        grpc_set_header nz-realip $remote_addr; # 如果你使用nginx作为最外层,就把上面一行注释掉,启用此行
        grpc_read_timeout 600s;
        grpc_send_timeout 600s;
        grpc_socket_keepalive on;
        client_max_body_size 10m;
        grpc_buffer_size 4m;
        grpc_pass grpc://dashboard;
    }
    # websocket 相关
    location ~* ^/api/v1/ws/(server|terminal|file)(.*)$ {
        proxy_set_header Host $host;
          # proxy_set_header nz-realip $http_cf_connecting_ip; # 替换为你的 CDN 提供的私有 header,此处为 CloudFlare 默认
        proxy_set_header nz-realip $remote_addr; # 如果你使用nginx作为最外层,就把上面一行注释掉,启用此行
        proxy_set_header Origin https://$host;
        proxy_set_header Upgrade $http_upgrade;
        proxy_set_header Connection "upgrade";
        proxy_read_timeout 3600s;
        proxy_send_timeout 3600s;
        proxy_pass http://127.0.0.1:8008;
    }
    # web
    location / {
        proxy_set_header Host $host;
         #proxy_set_header nz-realip $http_cf_connecting_ip; # 替换为你的 CDN 提供的私有 header,此处为 CloudFlare 默认
        proxy_set_header nz-realip $remote_addr; # 如果你使用nginx作为最外层,就把上面一行注释掉,启用此行
        proxy_read_timeout 3600s;
        proxy_send_timeout 3600s;
        proxy_buffer_size 128k;
        proxy_buffers 4 256k;
        proxy_busy_buffers_size 256k;
        proxy_max_temp_file_size 0;
        proxy_pass http://127.0.0.1:8008;
    }
}

upstream dashboard {
    server 127.0.0.1:8008;
    keepalive 512;
}
|
检查配置
1
2
3
|
nginx -t
#重新加载配置
nginx -s reload
|
登录哪吒后台
访问 https://nz.example.com 点击登录
首次默认用户名密码都为: admin
登录后点击安装命令 选择你的平台,去你想要的平台粘贴运行过一会就会显示你运行的服务器
修改背景图、登录用户和密码
点击头像- > 系统设置 - > 自定义代码(样式和脚本)
其他详解见官方前端wiki
 1
 2
 3
 4
 5
 6
 7
 8
 9
10
11
12
13
|
<script>
  window.CustomBackgroundImage = 'https://....png'
  window.CustomMobileBackgroundImage = 'https://....png'
  window.CustomLogo = 'https://....png'
  window.CustomDesc = '这是一个自定义描述'
  window.ShowNetTransfer = true
  window.DisableAnimatedMan = false
  window.CustomIllustration = 'https://....png'
  window.FixedTopServerName = true
  window.CustomLinks =
    '[{"link":"https://github.com/hamster1963/nezha-dash","name":"GitHub"}]'
  window.ForceTheme = 'light'
</script>
|
修改密码
点击头像- > 个人信息 - > 更新个人资料
建议将默认用户名和密码都修改了
其他
哪吒自定义备注地址:
https://nezhainfojson.pages.dev/ 用这个填写到公开备注里:效果如下

将自动更新,强制更新,ssh全关了
1
2
3
4
|
sed -i 's/disable_auto_update: false/disable_auto_update: true/' /opt/nezha/agent/config.yml && \
sed -i 's/disable_command_execute: false/disable_command_execute: true/' /opt/nezha/agent/config.yml && \
sed -i 's/disable_force_update: false/disable_force_update: true/' /opt/nezha/agent/config.yml && \
systemctl restart nezha-agent
|
或者
NZ_DISABLE_COMMAND_EXECUTE=true ./agent.sh